
Terminate an Employee & Issue a Record of Employment (ROE)
Province Payroll makes it easy to both terminate an employee and prepare their Record of Employment in one smooth workflow.
✍️ Steps to Terminate an Employee
Go to the employee's profile.
Scroll to the Employment Periods section.
Click the "Terminate" button.
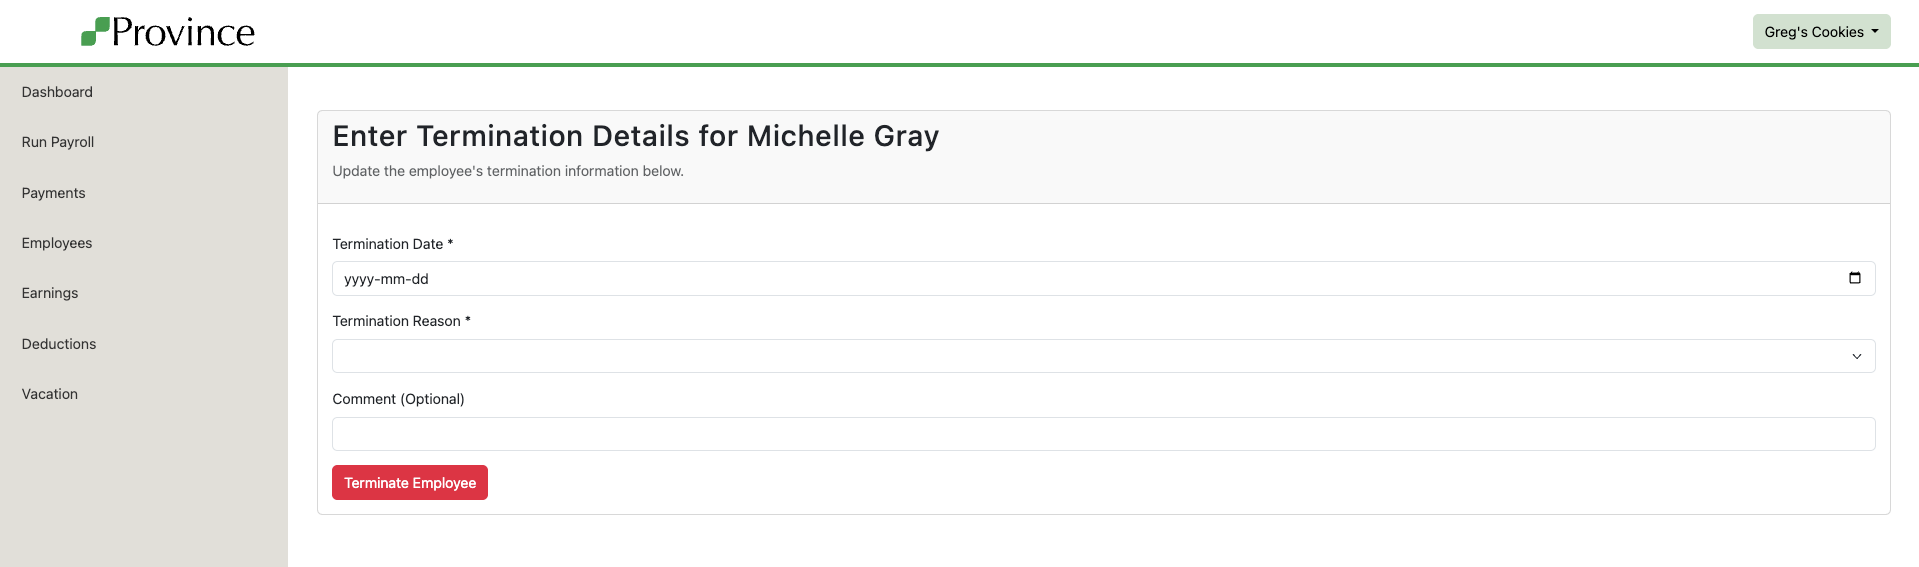
On the termination form, enter:
Termination Date (required) – The last day the employee worked.
Termination Reason (required) – Choose from the provided list.
Comment (optional) – Add any internal notes, this will not appear on the ROE.
Click Terminate Employee.
Once clicked:
The employee’s current wage will be closed.
Their employment period will be marked with an end date.
The employee will be excluded from future pay runs.
💡 Tip: Need to bring an employee back? See: How to Rehire an Employee
📋 Creating a Record of Employment (ROE)
After terminating an employee, you'll see a prompt to create their ROE. Canadian employers must issue an ROE within 5 calendar days of the end of the pay period in which an employee is terminated.
Before You Start
Make sure the following information is on file:
Employee’s Social Insurance Number (SIN)
Employee’s address
Business CRA Account Number
Business contact information (name, email, phone)
Step 1: Create Vacation Pay
Click Create ROE.

Step 2: Handle Vacation Pay
⚠️ Important: Canadian employers must pay out any remaining vacation balance upon termination of an employee. To make this easy Province Payroll has built this into the ROE workflow. When you click "Create ROE", the Vacation Pay Balance Checker will:
Show the employee’s current vacation balance
Check if vacation pay exists in open pay runs
Calculate the remaining balance after those pay runs
To pay out the balance:
Click "Create Vacation Pay Earning" if an open pay run exists (or create one first)
Go to that pay run and click Calculate
Return and Refresh the ROE creation page to confirm the balance is accounted for. You should see a message that reads “No action needed. The full vacation balance will be paid when the open pay run(s) are approved.”
💡 Tip: Switch the employee to “Pay Vacation Each Pay” to ensure any vacation that is accrued on the employee’s final pay is automatically paid out.

Step 3: Create the ROE Worksheet
Select the Reason Code (e.g., A00 - Shortage of work, E00 - Quit, M00 - Dismissal, etc)
Select Expected Date of Recall if the employee will be returning to the business:
U - Unknown (default option)
N – Not returning
Y – Expected date of recall (enter a date)
Add Comments (optional)
Click "Create and Review"
The system automatically calculates :
Block 15C – Insurable earnings and hours by pay period
Block 17A – Vacation pay
Block 17C – Other monies (bonuses, commissions, etc.)

Step 4: Review and Edit the ROE Worksheet
On the ROE Worksheet page, review all auto-calculated blocks.
To edit entries:
Click "Edit" next to any block to change amounts or dates
You can rebuild blocks if the employee's final pay run was modified after creating the ROE:
Click "Rebuild Block 15C" to recalculate pay periods
Click "Rebuild Block 17A" to recalculate vacation pay
Click "Rebuild Block 17C" to recalculate other monies
You can add manual entries for future payments that you’ll be making to employees if they’re entitled to them:
Click "Create Entry" for Block 17B (statutory holiday pay) or Block 19 (paid leave)
Step 5: Create the ROE Submission
Once the worksheet is correct:
Scroll to the Actions section on the ROE Worksheet page
Click "Create ROE Submission"
You’ll be redirected to the ROE Submission Workflow page
💡 Tip: What is a Submission?
A submission is a frozen snapshot of your ROE at a specific point in time.
This ensures your submitted ROE doesn’t change if you later if it’s rejected by Service Canada and you have to make updates to employee data or pay runs.


Step 5: Download XML and Submit to Service Canada
To generate the XML file:
On the ROE Submission Workflow page, scroll to Step 2: Download XML
Click "Generate & Download XML" & enter your password to start the download
The
.BLKfile will download to your computer
To submit to Service Canada via ROE Web:
Select "Submit ROE" → "Upload XML file"
Upload the
.BLKfileSubmit the ROE
Save the serial number provided (format: W123456789)
💡 Tip: We’ve put instructions with screenshots on how to navigate ROE Web right in the workflow, so you can follow those whenever you have to issue an ROE.
To update the status in Province:
Return to the ROE Submission Workflow page
In Step 3: Update Submission Status, select "Accepted"
Enter the serial number
Click "Update Status"
ROE Status Tracking
Your ROE moves through these statuses:
Draft → Not yet sent to Service Canada
Submitted → Uploaded to Service Canada
Accepted → Confirmed by Service Canada (requires serial number)
Rejected → Returned for corrections
If rejected, correct the ROE Worksheet and create a new submission.

Common Scenarios
Need to correct an ROE before submitting?
Edit the worksheet entries, then click "Update ROE Submission" to regenerate the snapshot.Service Canada rejected the ROE?
Update the submission status to Rejected, make corrections, and create a new submission.Approved new pay runs after creating the ROE?
Go to the worksheet, click "Rebuild Block 15C", then update the submission.Employee has no vacation balance?
Skip the Vacation Pay Balance Checker and create the ROE directly.
What if you need a PDF copy of the ROE?
Over the past few years, Service Canada has been moving away from paper and PDF ROEs.
As of October 2025, Province Payroll does not provide a PDF copy.
If your employee needs to see their ROE:
Once you’ve submitted the ROE to Service Canada and marked it as Accepted,
the employee can view it online through their My Service Canada Account.
Send your employee these instructions:
Sign in (or create an account)
Select “Employment Insurance”
Click “View ROEs”
The ROE will appear within 24–48 hours and can be viewed or downloaded as a PDF.
Tips
✅ Use the Vacation Pay Balance Checker before creating the ROE
✅ Generate the XML early to catch missing data
✅ Track serial numbers separately for your records
✅ Update the status to “Submitted” after uploading
✅ ROEs are due within 5 days—don’t wait for the final pay run
Need help? Review validation messages carefully—they show exactly what’s missing.